AEM 6.3 - How to extend Granite UI
Here in this article, I am going to explain how to extent Granite UI that is basically used to create AEM 6.x consoles.
There can be various use cases where in you may need that. In our case, author wants to take all the page creation requests through AEM instead of email communication. Authors are basically looking for a form in AEM authoring console so that requestor can login and submit page creation/Asset upload request.
Overall requirement is -
Solution -
1. Create a following structure - /apps/cq/core/content/nav/form and add the details given in below screenshot -


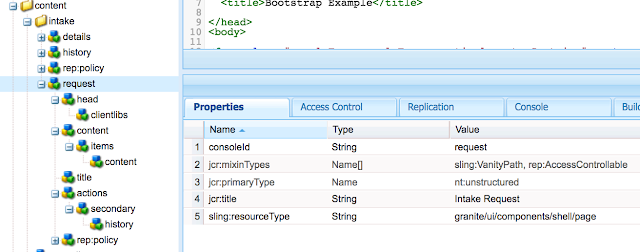
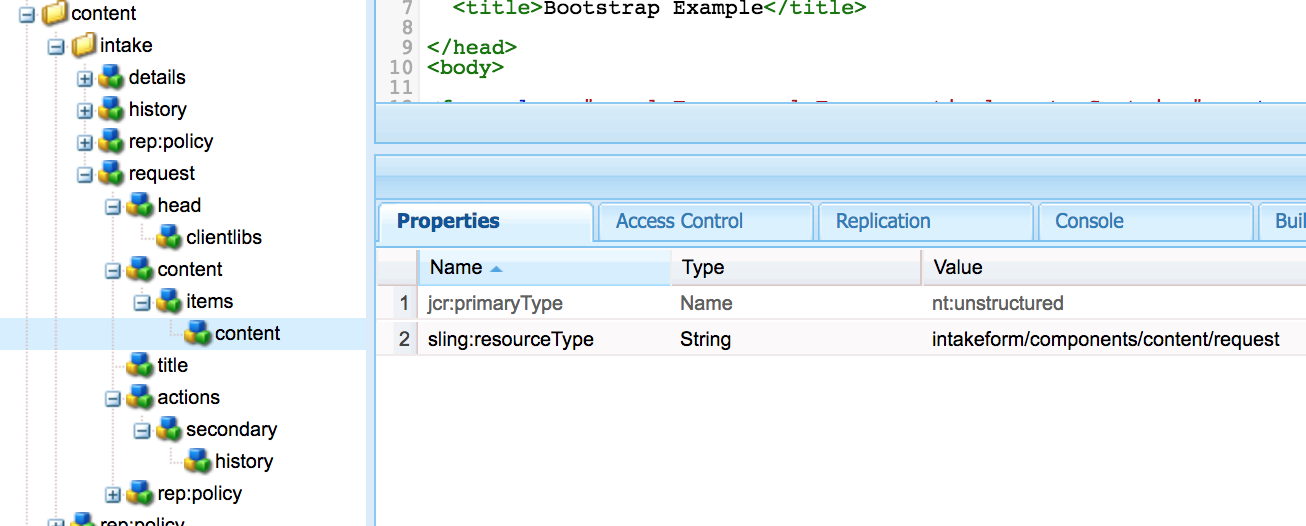
Create head, content, title and action nodes under page as per the screenshots -
Mention client libs as - coralui3, granite.ui.coral.foundation, granite.cloudviz, granite.operations.monitoring

content node's sling super type would be - granite/ui/components/coral/foundation/container

Under Items, create one more node and give resourcetype of your component that you want to render as intake form - intakeform/components/content/request

Create title node and mention text and resourceType as - granite/ui/components/coral/foundation/text

Create History button with supertype - granite/ui/components/coral/foundation/anchorbutton

Component intakeform/components/content/request, looks like -

It is written in JSP.
After doing all these efforts, request form will look like -

Similarly you can create History page and Details page -


There can be various use cases where in you may need that. In our case, author wants to take all the page creation requests through AEM instead of email communication. Authors are basically looking for a form in AEM authoring console so that requestor can login and submit page creation/Asset upload request.
Overall requirement is -
- Need a link in Navigation so that author can click on it and go to a Intake form.
- Author must be able to fill and save the intake requests.
- Author must be able to see the history of submitted intake requests
- Able to see the details of submitted intake requests.
Solution -
1. Create a following structure - /apps/cq/core/content/nav/form and add the details given in below screenshot -

You basically need to add - href, title and icon. Href is the path of page where user will land on clicking it.

After that, you will be able to see the icon in Navigation as shown below -

2. Next task is to create the Intake form, History and details pages. Lets start with request form -
Request form -
In order to create the request form, I have used sling:resourcesupertype - granite/ui/components/shell/page. Shell page actually give screens, AEM console like look and feels.

Mention client libs as - coralui3, granite.ui.coral.foundation, granite.cloudviz, granite.operations.monitoring

content node's sling super type would be - granite/ui/components/coral/foundation/container

Under Items, create one more node and give resourcetype of your component that you want to render as intake form - intakeform/components/content/request
Create title node and mention text and resourceType as - granite/ui/components/coral/foundation/text

Create History button with supertype - granite/ui/components/coral/foundation/anchorbutton

Component intakeform/components/content/request, looks like -

After doing all these efforts, request form will look like -


Here is the package attached, you can install and go through it -
https://bitbucket.org/sujeetsharma1980/extendgraniteui.git
Note : There screens are dummy screens, you can write backend code for the same.
Let me know if you have any question.

Comments
Post a Comment